Friday, May 31, 2013

Boston Cream Bites

Boston Cream Bites Recipe

I saw this Boston Cream Bites recipe from Betty Crocker a few weeks ago, and I've been itching to make it. And I'm glad I did, it definitely did not disappoint. Yummy and so easy to make. I hope you guys like it too!


BOSTON CREAM BITES

1 box Betty Crocker SuperMoist French vanilla cake mix
1 cup water
1/3 cup butter, softened
3 eggs
1 cup prepared vanilla pudding
1 cup semisweet chocolate chips (6 oz)
3/4 cup whipping cream   
  1. Heat oven to 350 degrees F. Generously grease 48 mini muffin cups with shortening or cooking spray; lightly flour.
  2. In a large bowl, stir together cake mix, water, butter and eggs until smooth. Divide batter evenly among muffin cups.
  3. Bake 8 to 10 minutes or until tops of cupcakes spring back when touched lightly in center. Cool completely, at least 15 minutes. Remove cupcakes from pans to cooling racks.
  4. Using sharp knife, cut top off each cupcake and reserve. Spoon 1 teaspoon pudding onto center of each cupcake bottom. Cover with cupcake tops.
  5. In small microwavable bowl, microwave chocolate chips and whipping cream uncovered on High 30 to 60 seconds or until chips can be stirred smooth. Spoon chocolate mixture on top of each cupcake. Let stand until set. Store in refrigerator.

This post was featured here:


I linked this post to these wonderful parties:
Alderberry Hill : Make the Scene Monday  |  Angels Homestead : Saturday Spotlight  |  Anyonita Nibbles : Tasty Tuesdays  |  A Peek Into My Paradise :  T.G.I.F. Link Party  |  A to Zebra Celebrations : Link Party Tuesdays  |  BeBetsy : Brag About It Tuesday Link Party  |  Create With Joy : Inspire Me Monday  |  Domesblissity : Thriving on Thursdays Linky Party  |  Frugal Foodie Mama : Marvelous Mondays  |  I Should Be Mopping the Floor : Mop It Up Monday  |  Life With The Crust Cut Off : Two Girls and a Party  |  Living Better Together : TGIF Link Party  |  Love Bakes Good Cakes : All My Bloggy Friends  |  Lydia's Flexitarian Kitchen : Get Inspired Pinning Party  |  Memories by the Mile Link Party  |  Natasha In Oz : Say G'day Saturday Linky Party  |  Piggy In Polka Dots : Party In Polka Dots  |  Rain on a Tin Roof : Give Me the Goods Monday Link Party  |  The NY Melrose Family : Whimsy Wednesdays  |  The Wondering Brain : My Favorite Posts SHOW OFF Weekend Blog Party  |  Titi Crafty : Bewitch Me & Titi Link Party

Wednesday, May 29, 2013

FREE Printable World's Greatest Dad Book

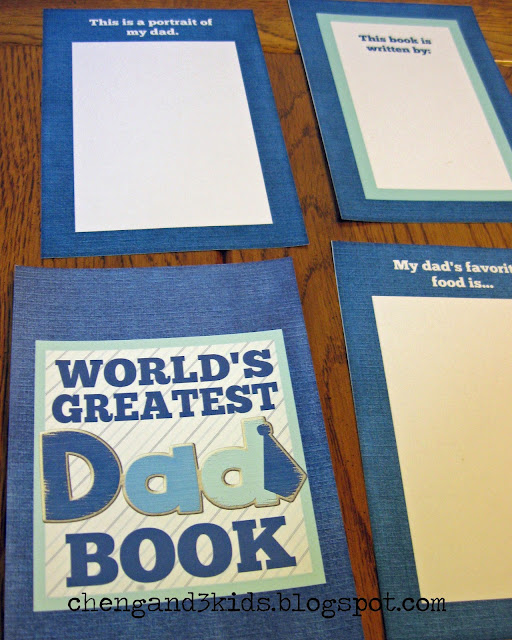
This is a free printable book for Father's Day or a gift for a dad's birthday.

These are free printable book pages that would be perfect for Father's Day or a dad's birthday gift. You can get one of those inexpensive 4 x 6 photo albums, then just download these pages, print, cut, have your child draw or write - or even draw and write - on the pages, insert them in the sleeves of the album, and you're good to go. Unfortunately, I didn't have the album, but it was fairly easy to make this book. Let me show you how I did it.

First, I printed out the pages, then used my trimmer to cut them. 

This is a free printable book for Father's Day or a gift for a dad's birthday.

I used a photo paper for the cover page and presentation paper for the rest of the pages. But you can use regular printer paper if you want.

This is a free printable book for Father's Day or a gift for a dad's birthday.

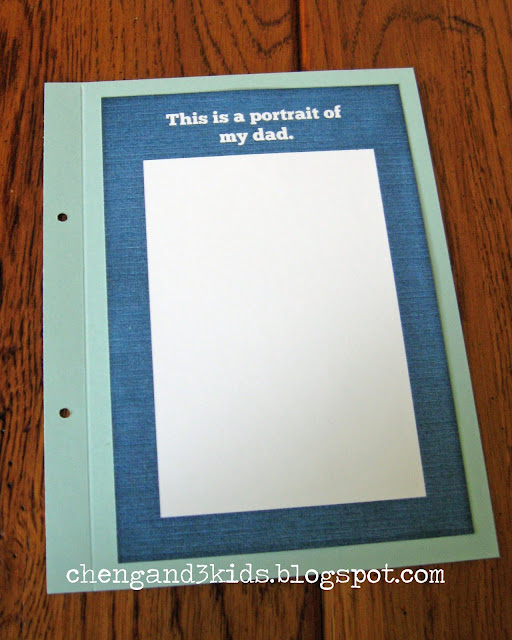
Then I used my paper trimmer to cut some light blue cardstock into 5-by-6 1/2 inches, this will serve as a mat  for the prints. And then I used my scoring board to score 1/2 inch from the left side.   

Then I adhered the printed out pages to the cardstock with double sided tape. I punched two holes on the left side, and used brads to hold all the pages together. But you can also staple it, or use ribbons, whatever floats your boat. Easy peasy, right? The kids would have fun filling out the pages too.
This is a free printable book for Father's Day or a gift for a dad's birthday.
I made these printables by using the Father's Day digital scrapbooking kit from Kristal Kreations. Do check out her blog, you'll be glad you did!

So here are the free downloads. Just click on the title underneath the photos. These are all 4 x 6 pages, the watermark is not gonna be on the downloaded sheets. You are more than welcome to download and print all of them, but you can also choose to download just the pages you want to include in your book. Enjoy!
This is a free printable book for Father's Day or a gift for a dad's birthday.


This is a free printable book for Father's Day or a gift for a dad's birthday.


This post was featured here:


I linked this post to these wonderful parties:
Alderberry Hill : Make the Scene Monday  |  Angels Homestead : Saturday Spotlight  |  A Peek In to My Paradise : TGIF Link Party  |  A Night Owl : Create & Inspire Friday Linky Party  |  A to Zebra Celebrations : Link Party Tuesday  |  BeBetsy : Brag About It Tuesday Link Party  |  Carrie This Home Frugal : Crafty Home Blog Hop  |  Cooking With Curls : Wednesday Whatsits  |  Create With Joy : Inspire Me Monday  |  Domesblissity : Thriving on Thursdays Linky Party  |  Ducks 'n a Row : Wonderful Wednesday Blog Hop  |  Frugal Foodie Mama : Marvelous Mondays  |  I Should Be Mopping the Floor : Mop It Up Monday  |  Life With The Crust Cut Off : Two Girls and a Party  |  Love and Laundry : Weekend Wonders  |  Love Bakes Good Cakes : All My Bloggy Friends  |  Memories by the Mile Link Party  |  Natasha In Oz : Say G'day Saturday Linky Party  |  Oh My! Creative : Whimsy Wednesday Link Party  |  Piggy In Polka Dots : Party In Polka Dots  |  Rain on a Tin Roof : Give Me The Goods Monday  |  Titi Crafty : Bewitch Me & Titi Link Party  |  The Pin Junkie : Pin Junkie Link Party  |  The Wondering Brain : My Favorite Posts SHOW OFF Weekend Blog Party  |  Thirty Handmade Days : Pity Party

Saturday, May 25, 2013

Strawberry Squares

Strawberry Squares Recipe

My little boy loves anything with strawberries, so when I saw this Strawberry Squares recipe at skinnytaste.com, I knew it would be a big hit with him. 

I checked our pantry and, lo and behold, we have all the ingredients needed for the recipe! Must be a sign!

These are the ingredients for strawberry squares - butter, sugar, eggs, vanilla extract, flour, strawberry pie filling, confectioner's sugar baking spray.

The little boy saw me setting up the ingredients and insisted on helping me. And since I know from experience that he's not going to stop bugging me until I say yes, I let him hold the handheld mixer while I add the ingredients into the bowl. 

But I think his favorite part was when I started scoring the dough into squares...


...and put the pie filling in them. His exact words were, "Whoa, that's so cool!" 


It's weird that some of the pie filling sank (or is it sunk?) into the bottom. I'm not really sure why.


Oh well, still not bad for my first attempt, right? 

Nath wanted to eat it right away but we had to wait for it to cool off. And what's a mom to do to make good use of the time? Take more pictures of my little boy, of course!


And now it's finally time for the taste test.


And the verdict is....


... a thumbs up! Yay!


STRAWBERRY SQUARES

1/2 cup unsalted butter, softened
1 1/2 cups granulated sugar
4 large eggs, at room temperature
1 tsp. pure vanilla extract
2 cups all-purpose flour
1/2 cup canned strawberry pie filling
confectioner's sugar for dusting
baking spray

Preheat oven to 350 degrees. Spray Baking Pam in a 13 x 9 inch baking pan.

In a large bowl, on the medium speed of an electric mixer, cream the butter with the granulated sugar until smooth, about 2 minutes. Add eggs, one at a time, beating well after each addition. Add the vanilla. Add the flour and mix thoroughly.

Spread the dough evenly in the prepared pan. With a small, sharp knife (or toothpick), score into twenty-four 2-inch squares. Place a teaspoon of pie filling in the center of each scored square. Bake for 30-35 minutes, or until a cake tester inserted in the center of the pan comes out clean. Bool to room temperature, then sprinkle with confectioner's sugar before cutting and serving.


I linked this post to these wonderful parties:

Friday, May 24, 2013

Spirit Week at Nath's School

This week was pretty exciting for my little boy's kindergarten class. It's fun seeing them all dressed up for Spirit Week, they're just so cute. I'm glad that Nath actually wanted to join in on the fun. When he was in preschool, there were times when he didn't want to wear what they are supposed to wear for school that day, and that made those mornings very, very frustrating. I guess he really is growing up (sniffle sniffle).

Okay, now for the fun part - showing the pictures! 

Now here was Day 1 of Spirit Week, Sunglasses Day...

This is Sunglasses Day at my son's school for Spirit Week.

Day 2 was Shorts Day...

This is the 2nd day of Spirit Week at my son's school - shorts day.

Day 3 is my favorite - Hollywood Day! Note: This was his choice of clothes, not mine...

This is Hollywood Day for Spirit Week at my son's school.

The minute he walked in the classroom, his teacher said, "You look like a producer or director. The man with the money." So funny.

The 4th day was Hawaiian Lei Day...

This is Hawaiian Lei Day for Spirit Week at my son's school.

He took off the lei after a few minutes and just laid it down on his desk. He said it's too uncomfortable.

Then Day 5 was Hawaiian Day...

This is my son wearing a Hawaiian shirt for Spirit Week.

I was genuinely surprised that he wanted to wear this. They had a Hawaiian Day in preschool before and he threw a fit when I tried to put a Hawaiian shirt on him. He said that Hawaiian shirts are girly, I have no idea where he got that.

So yeah, that was Nath's Spirit Week. His class is going to have a musical performance in about a couple of weeks. And I'm super excited to see it!


Saturday, May 18, 2013

FREE Printable Birthday Gift Tags

These are free printable HAPPY BIRTHDAY gift tags, it comes in 8 colors - red, black, blue, green, purple, pink, yellow and brown. Each color is available in 2 sizes, 2x3 and 4x6.

I remember watching one of those Korean dramas with my girls, and there was an episode where this rich guy has an ice-queen-wanna-be mom who could not be bothered to remember her son's birthday. Then there was this poor plain-Jane-super-shy girl who tried to cheer him up by taking him to these really inexpensive places, and of course he's not used to going to these kind of places, but later on he finds himself actually enjoying himself. Then towards the end of the day, the girl leans in and whispers to him,"Since today is the day you were born, it is a truly precious day. Thank you for being born." 

I know, I know, it's super cheesy, right? But that doesn't mean it's not true. I don't care what anybody says, everybody wants to feel special on their birthday. So naturally, they're gonna need somebody to make some kind of effort to make their birthday a little bit special. And this responsibility falls on you - yes, you - not the other person sitting right next to you... YOU.

Now, before you go running for the hills, there is no need to fret. Like I keep telling my kids, special doesn't necessarily mean expensive. Sure it would be nice to surprise somebody with a brand new car or an all-expense-paid vacation to some exotic resort, but in this economy, well, good luck with that. (Just kidding!)

What I mean to say is, it really doesn't matter how much the gift costs. What's important is you went out of your way to make this person feel loved. Now that is special. 

I have here some free printable gift tags for you. They're available in eight colors - black, red, blue, pink, purple, yellow, brown and green. Each color comes in two sizes, 4x6 and 2x3. If you want some ideas on how to use these gift tags, you can click here, here and also here. Download, print and enjoy!


Thursday, May 16, 2013

Mini Cherry Cheesecakes

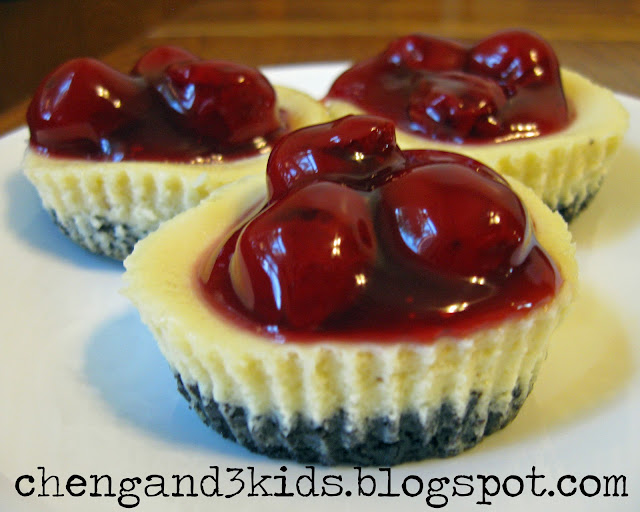
These are mini cherry cheesecakes with Oreo crust I made using Bakerella's recipe.

 I made these mini cherry cheesecakes last Mother's Day. It was really easy to make and the kids loved it. Hopefully my mom liked it too. This is actually the second time I tried making it. I've seen the recipe on Bakerella  a while back and it was just so good and so simple I just couldn't resist making it again.

So here it is,

2 package of (8 oz.) cream cheese, softened to room temperature
3/4 cup sugar
3 eggs
1 tablespoon vanilla
1 tablespoon lemon juice
Mix.

vanilla wafers
2" aluminum mini baking cups
Cherry Pie Filling

Place a vanilla wafer in each mini baking cup. Spoon approximately 3 tablespoons of cream cheese mixture over each wafer. Makes about 4 dozen.

I couldn't find the 2" aluminum baking cups she used, but I found this at the Commissary in the Navy Base for 66 cents. They're 2 1/2 inches but I didn't have any problem with it.
These are the aluminum baking cups I used for my mini cherry cheesecakes.

I followed Bakerella's instructions on the cream cheese mixture. But for the crust, instead of using Nilla wafers, I crushed up some Oreo cookies, mixed it with some melted butter, and pressed it onto the baking cups.

Here's a picture of my little helper scraping off the cream from the Oreo cookies.


He's asking if we can make them again. But this time, he wants strawberries instead of cherries on top. Hmmm... It actually sounds like a good idea. We might just have to try that.
I Should Be Mopping The Floor : Mop It Up Mondays
Life With The Crust Cut Off : Two Girls And A Party
Love and Laundry : Weekend Wonders
Love Bakes Good Cakes : All My Bloggy Friends
Memories by the Mile : Tuesday Trivia and Link Party
My Turn For Us : Freedom Fridays
Oh My Creative : Whimsy Wednesday
Piggy In Polka Dots : Party In Polka Dots
Rain on a Tin Roof : Give Me The Goods Monday
The Pin Junkie : Friday Link Party
The Wondering Brain : My Favorite Posts SHOW OFF Weekend Blog Party
Thirty Handmade Days : Pity Party Weekly Linky Party
Titi Crafty : Bewitch Me & Titi Link Party

Wednesday, May 15, 2013

Father's Day Handmade Gift Ideas

Father's Day is coming up and I thought I would post some handmade gift ideas. I made these coupon books about 2 years ago, one for my stepfather and another one for my husband. They're actually my 6-year-old boy's gift for them, so he helped me decide what to write on the coupons.

This one is for my stepfather. The Filipino word for grandfather is lolo, but when Nath was younger, he couldn't pronounce it right, it sounded like Woewoe. His grandpa thought it was cute so that's what Nath calls him up to this day.

This a handmade gift for Father's Day and also a good gift for a dad's birthday.

Here is how it looks like inside...

A handmade gift for Father's Day or a dad's birthday.

A handmade gift for Father's Day or for a dad's birthday.

This one is my favorite. Want to know why?

A handmade gift for Father's Day or for a dad's birthday.

You lift up the flap, and inside it you will find...

A handmade gift for Father's Day or for a dad's birthday. This page has a band-aid inside the flap.

...TADA!...a band-aid for his grandpa's owie. Nath thought that was pretty cool.

This is the last page. I'm glad Nath wrote his name here. Makes me pretty nostalgic looking at his handwriting now. Why do they have to grow up so fast? (sigh)

This is a coupon book that can be made for Father's Day or as a gift for a dad's birthday.

This one is for my husband. He is a big Chargers fan, hence the Chargers colors. Tatay is Filipino for dad. The inside pages are very similar to the ones above.

Father's Day gift idea, also good as a dad's birthday gift.

I also made a digital scrapbook page in a frame for my stepfather. He said he likes the Grandpas hold our tiny hands... quote and also the picture of their hands. I gotta say, I'm liking it too. (^_^)

Grandpas hold our tiny hands for a little while but our hearts forever.

Here is what it looked like all gift-wrapped. I used rub-on letters on little pieces of paper to spell out Happy Father's Day.

This is how I gift wrapped my Father's Day gift.

I made these for Father's Day, but I think they would make great gifts for birthdays too. What do you think?


Tuesday, May 14, 2013

Mother's Day 2013

Ever since my parents moved here from San Jose, it became somewhat a tradition for us to celebrate Mother's Day at their place. This year I decided to make my mom a Mother's Day card...

This was the card I made for my mom for Mother's Day.

...and some Mini Cherry Cheesecakes. I used Bakerella's recipe to make these. They turned out great and they're also super easy to make. Click here for the recipe.

These are Mini Cherry Cheesecakes I made for Mother's Day, I used Bakerella's recipe for these.

My hubby and kids were really sweet. My little boy had some artwork he made in school for me, and the girls made breakfast - Bea cooked some omelets while Claire fried the bacon strips. They also got me some flowers. Then around lunchtime, we picked up some food and went over to my parents' house. It was just a simple family get-together, but it was fun just hanging out with them. It was even hot enough for the pool. So of course Nath took advantage of that.


How about you? How did you celebrate Mother's Day?

Friday, May 10, 2013

Claire's 13th Birthday Party

 My daughters are anime fanatics, so when Claire was turning thirteen, we decided to throw her an anime/Japanese themed birthday party. It was supposed to be a surprise for her, but the day before the party, she caught me making some of the decorations when she came home from school. But even though she was getting suspicious, my parents still took her to Game Stop, hours before the party, so that we can set everything up.

The cherry blossom on the background is a vinyl wall decal we got from Amazon.

This was my daughter's anime or Japanese themed 13th birthday party.

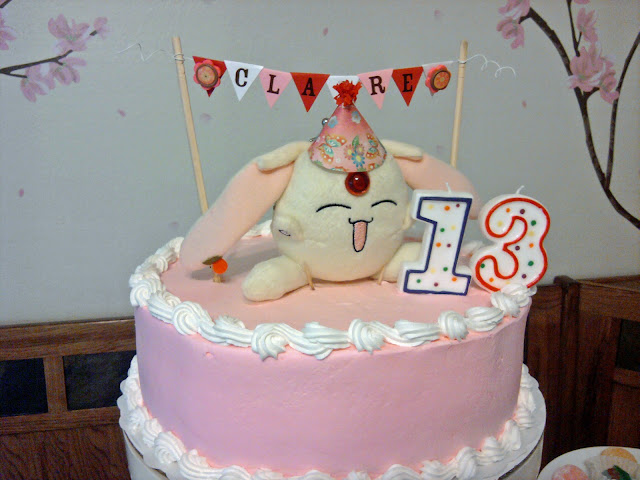
This adorable plush creature on the cake is called a Mokona, and is a character from Tsubasa: Reservoir Chronicle. We used it as a cake topper but it's actually a coin purse. I placed a piece of wax paper underneath it so it doesn't get any frosting on it. I also made the teeny tiny party hat , and the CLAIRE banner.

The adorable character on the cake is called Mokona from Tsubasa Reservoir Chronicles, and it is actually a coin purse.

This was my daughter's anime/Japanese themed birthday party.

This is my daughter's 13th birthday party with an anime/Japanese theme.

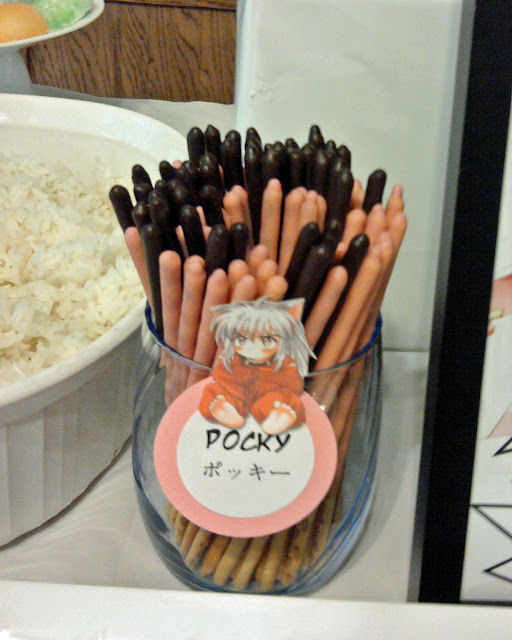
I used google translate for the food labels, the framed image, chopstick holders, candy wrappers and favor tags. The chibi characters on the food labels were pictures we found online. We printed them out, cut them and then used foam adhesive to stick them on the food labels. Aren't they cute?

This is the anime themed food label for Pocky.

These are the anime themed food labels for the sushi.

These are the anime themed food labels for the rice balls or onigiri, and mochi.

These are the anime themed food labels for mochi and beef teriyaki.

 The kids had fun trying out the Japanese food, but I think they were relieved when we ordered pizza. I guess it takes some getting used to.

These are the customized chopstick holders I made for my daughter's anime/Japanese themed party.

Some of the games they played were similar to the games we had for Bea's 15th birthday. We had the chopsticks game - whoever gets the most jelly beans by using the chopsticks wins, fan the balloon game - each person gets one balloon, whoever manages to make the balloon stay up in the air the longest by fanning it, wins, and our own version of fukuwarai - a game similar to pin the tail on the donkey, but instead of using a face, we used a picture of Pikachu. The prize for the games were Hershey's Chocolate bars. I just replaced the wrappers with the a paper with the word Congratulations in English and also in Japanese.

This is the customized Hershey's chocolate bar wrapper I made for my daughter's anime/Japanese themed party.

After the games, the kids went to the living room and played video games.

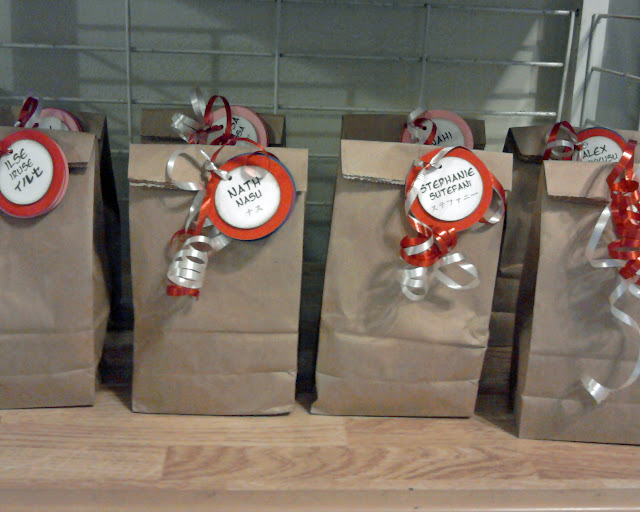
These were the party favors, inside the bags were some Japanese candies. The kids thought it was pretty cool seeing their names written in Japanese characters.

These are the party favors with personalized tags, inside the bags are Japanese candies.


I linked this post to these wonderful parties: