Showing posts with label Silhouette Cameo. Show all posts

Friday, May 9, 2014

M&M's Teacher Gift

M&M's Teacher Gift by chengand3kids.blogspot.com #teachergift #teacherappreciationday #giftidea

Today is the last day of Teacher Appreciation Week. And of course I couldn't let the week go by without giving my little boy's teachers a little something to let them know how much we appreciate all their hard work.

I've always believed that gifts don't have to be expensive for them to be special. These M&M's don't cost a lot, but the wrappers/holders are made with love.

I saw the "teachers plant seeds that grow forever" quote on the internet and I loved it instantly! My little boy is blessed to have wonderful teachers. And I know that this is one of the reasons why he is doing well in school.

And for that, I really am thankful.

I made this with my Silhouette Cameo. I used the love grows stronger tree shape (Design ID #38741). The font is called A Little Pot (you can find it here). And the paper is from the Sakura 2009 digital kit by Akizo Designs.

This post was featured at:


I linked this post to these wonderful parties:
Bewitch Me & Titi Link Party : Titi Crafty  |  Freedom Fridays with All My Bloggy Friends : Love Bakes Good Cakes  |  Friday Flash Blog : The Jenny Evolution  |  Friday Link Party : The Pin Junkie  |  Inspire Me Monday : Create with Joy  |  Say G'Day Saturday Linky Party : Natasha in Oz  |  Share Your Stuff Tuesdays : Table for Seven  |  The Wednesday Roundup: Crafty Wife  |  Whimsy Wednesdays : The NY Melrose Family

Wednesday, March 19, 2014

Nath's Batman Party

Batman Themed Birthday Party by Cheng and 3 Kids

My little boy is very specific about his birthday parties. When he turned 4 he wanted a Camouflage/Army themed party, his 5th birthday was a Sonic the Hedgehog party, 6th birthday was Avatar: The Last Airbender party. And for his 7th birthday, what he wanted was a Batman themed party.

So what's a mom to do?

Start working on his birthday decorations! :)

Batman and Batgirl Cupcake Toppers by Cheng and 3 Kids


Since his birthday is on a school day, we brought some cupcakes for his class. His school does not allow parents to bring homemade food, so we bought these cupcakes from Vons, and I made the toppers with my Silhouette Cameo. The toppers are pretty much unisex, but I made some Batgirl toppers for the girls, just in case they prefer a female superhero. ;)

Batman Party Decorations by Cheng and 3 Kids

These bats were also made with my Silhouette Cameo. It was really simple but I love how it looked on the wall. Nothing says batcave like a swarm of bats, right?

Batman Birthday Cake by Cheng and 3 Kids

We ordered his cake from our favorite bakery. The topper is actually a toy we got from Walmart. My little guy thought it's the coolest cake ever. :)

Batman Party Decorations by Cheng and 3 Kids

These paper plates are from Party City. As you can see in the photo, we got the Batman themed dessert plates, and solid color dinner plates. I also placed a 12 x 12 cardstock paper underneath which serves as a placemat and it also adds a nice pop of color.

Batman Party by Cheng and 3 Kids

The NATH letters on the tablecloth are also made with my Silhouette Cameo. The print and cut feature is so fun! :)

DIY Batman Gift Wrap by Cheng and 3 Kids

If you've been reading my blog for some time, you'd know that I have a tendency to go a little crazy with gift wrapping ( need proof? click here ). There's just something about a really nice gift wrap that makes me so happy. And my Silhouette cutting machine makes it so easy to make one-of-a-kind gift wraps. Did I mention how much I'm loving the print and cut feature? ;)

DIY Batman Gift Wrap by Cheng and 3 Kids

For this gift tag, I used Adobe Photoshop Elements 9. Then I matted it on a paper that I wrapped in aluminum foil. The foil just gives it a silver metal look that I think looks cool with this particular Batman photo.

Batman Birthday Party by Cheng and 3 Kids

Here's a photo of the birthday boy. I still can't believe he's seven years old. Time flies by so fast... a little too fast if you ask me. (sigh)


I linked this post to these wonderful parties:


Friday, January 24, 2014

Classroom Valentine's Day Idea

Cheng and 3 Kids : Classroom Valentine's Day Idea

This is what we gave out last year at my son's kindergarten class for Valentine's Day. Everybody thought it was pretty cute. I had so much fun making them too!

If you're wondering if he was standing in front of a red textured wall when I took his picture, then you're wrong. I am far from being computer savvy, but there's this neat little trick I learned from watching YouTube tutorials (several of them actually, I guess I'm a slow learner, LOL). It's called a layer mask, and this is what I used to merge my little boy's photo onto the red digital paper.

All I needed was a camera, a camera ready child :), photo editing software (I used Adobe Photoshop Elements 9), card stock paper (I used pink for the heart and blue for matting), photo paper, heart shaped Dove Chocolates, and glue dots.

Here's how I did it.

First, I cut out a heart shape on pink card stock paper with my Silhouette Cameo. But you can also use scissors if you want.

Cheng and 3 Kids : Valentine's Day Idea - Layer Mask tutorial for Adobe Photoshop Elements 9

Then, I took a picture of my little boy holding the paper heart. I chose this white wall as the background so it would be easier for me to edit it.

Cheng and 3 Kids : Valentine's Day Idea - Layer Mask tutorial for Adobe Photoshop Elements 9

Next, I opened the file on Adobe Elements 9, resizing the image so that the heart is slightly bigger than the chocolate heart. (For demonstration purposes, I made this one bigger than the actual Valentine cards I made for his class.)

Cheng and 3 Kids : Valentine's Day Idea - Layer Mask tutorial for Adobe Photoshop Elements 9

After that, I opened the digital paper that I wanted to use as the background (the digital paper is from the Lovey Mini Kit by Pixel Gypsy). The picture has to be on top of the digital paper as illustrated on this photo above (blue circle). If the digital paper happens to end up on top of the picture, all you have to do is to drag it down and vice versa.

Cheng and 3 Kids : Valentine's Day Idea - Layer Mask tutorial for Adobe Photoshop Elements 9

Then, I clicked on the image - please check out the blue circle (or blue oblong, if you want to be technical, LOL) - and then I clicked on the Quick Selection Tool, then New Selection (blue arrows).

Cheng and 3 Kids : Valentine's Day Idea - Layer Mask tutorial for Adobe Photoshop Elements 9

What the Selection Tool does is it draws a path around the image that you want to merge into the background. So I clicked on my little boy's image. Sometimes the path doesn't go around the whole image, you just have to drag the path until the whole image is included.

Cheng and 3 Kids : Valentine's Day Idea - Layer Mask tutorial for Adobe Photoshop Elements 9

Next, I clicked on the Add Layer Mask Tool (blue arrow). Now you'll see that his picture is merged into the red digital paper.

Cheng and 3 Kids : Valentine's Day Idea - Layer Mask tutorial for Adobe Photoshop Elements 9

I wasn't too happy with the selected image because as you can see on the photo above, some of the white wall was showing. So I clicked on the brush tool, making sure that the Foreground Color is on top of the Background Color (blue arrows), if not, just click on Switch Foreground and Background Colors. Then I clicked on the area that needs to be erased. Whenever I erase too much and need to bring it back, I just switch the foreground and background colors then click on the erased area again. Fun, right? :)

Next, I added the text (I used Cheri font for the text) and the slight glowing effect. Aaaannnd I'm done!

Well, the digital part anyways. :)

I printed them out using the photo paper, cut them, then matted them on blue card stock paper and adhered the Dove Chocolates with glue dots.

As I've mentioned at the beginning of this post, we gave these out last year. I haven't decided what we're giving out for Valentine's Day this year. I guess I'm gonna be doing a lot of searching on Pinterest. :)

What about you? Are your kids ready for Valentine's Day?

This post was featured at:


I linked this post to these wonderful parties:
All Things Thursday Blog Hop : Posed Perfection  |  Bewitch Me & Titi Link Party : TitiCrafty by Camila  |  DIY Sunday Showcase Link Party : VMG 206  |  Freedom Fridays with All My Bloggy Friends : Love Bakes Good Cakes  |  Friday Flash Blog : The Jenny Evolution  |  Friday Link Party : The Pin Junkie  |  Frugal Crafty Home Blog Hop : Carrie This Home  |  Give Me the Goods Link Party : Rain on a Tin Roof  |  Happiness is Homemade Link Party : A Peek Into My Paradise  |  Inspire Me Monday : Create With Joy  |  Ladies Only Blog Share : Mommifried  |  Link Party Tuesday : A to Zebra Celebrations  |  Mega Inspiration Monday : I Should Be Mopping the Floor  |  My Favorite Things Saturday : A Time For Seasons  |  Share Your Stuff Tuesdays : Table for Seven  |  Shine A Spotlight Saturday : Angels Homestead  |  The Party Bunch : Thirty Handmade Days  |  Thriving on Thursdays : Domesblissity  |  Valentine Link Party : Hoopla Palooza  |  Wake Up Wednesday Linky Party : A Peek Into My Paradise  |  Whimsy Wednesdays : The NY Melrose Family  |  Wonderful Wednesday : Ducks 'n a Row

Tuesday, December 24, 2013

Christmas Gift Wrapping Ideas

Christmas Gift Wrapping Ideas by Cheng and 3 Kids

My little boy has been counting the days 'till Christmas.
I don't blame him.
I mean, what kid doesn't want to just get up on Christmas morning and go running to the Christmas tree to get their gifts?
I always love watching the kids' faces light up when they find their presents under the tree.
This is one of the reasons why I make the extra effort to make the gifts look pretty.
Seeing them all excited even before unwrapping the gifts makes it all worthwhile.

Do I get upset that the gift tags and wrappers are all just gonna end up in the trash?
Nope!
That's what the photos are for!
They're all gonna be immortalized here in the internet. LOL
You can also use those photos for a scrapbook. (Yay! Another project idea!)

My Silhouette Cameo is very handy for making these gift tags.
There are so many shapes to choose from!
And lately, they have a 12 Days of Christmas Countdown which means there's a free shape until Christmas!
How cool is that?

Christmas Gift Wrapping Ideas by Cheng and 3 Kids

I used the Stitched Scallop Square Mat (Design ID #46831) and the Anderson Four Feather Falls font to make this tag. I also added some rhinestone stickers just to give it a touch of bling. :)

Christmas Gift Wrapping Ideas by Cheng and 3 Kids

For this one, I used the Christmas Stocking shape (Design ID #52729). I used glitter paper for the mini gift that goes into the stocking. Why? Because this gift is for a 7-year-old little girl, who happens to love glitter. :)

I was really happy with how these gift tags turned out... but then something happened.
My Silhouette Cameo started weirding out on me.
So after several failed attempts at fixing the problem, I decided I'm gonna have to finish the tags without it.
So does this mean I'm gonna use store bought gift tags?
HECK NO!
I started making the gift tags with digital scrapbooking kits!
Check out these babies!

Christmas Gift Wrapping Ideas by Cheng and 3 Kids

Christmas Gift Wrapping Ideas by Cheng and 3 Kids

Christmas Gift Wrapping Ideas by Cheng and 3 Kids

And for the kiddos who don't know how to read their names yet...

Christmas Gift Wrapping Ideas by Cheng and 3 Kids

Christmas Gift Wrapping Ideas by Cheng and 3 Kids

Christmas Gift Wrapping Ideas by Cheng and 3 Kids

Here's where I got these fabulous digital kits. Please feel free to check them out.

Here are some more gift tag/gift wrapping ideas just in case you missed them:

Christmas Stocking Gift Tag
Gingerbread Man Gift Tag
Snowflake Gift Tag

Christmas Teacher Gift

Free Printable
Christmas Gift Tags

I linked this post to these wonderful parties:


Sunday, December 15, 2013

Snowflake Gift Tag

Snowflake Gift Tag by chengand3kids

I love Christmas!

I love the colors, the lights and the decorations.

I love all the food (but not the extra pounds, UGH!)

And I also LOVE wrapping the gifts and thinking of ways to personalize each and everyone of them!

My husband gave me my Silhouette Cameo as a birthday gift a few years ago. And I love (there's that word again, haha!) how it makes gift-tag-making super easy! No more store-bought gift tags for us!

Now, I know this can be time consuming but I'm having way too much fun to worry about the time. Yup, I am a gift tag junkie. (Yes, it's a thing.)

I used the Classic Snowflake Set shape (Design ID #23309), and the Aharoni Font.
Here's a closer look.

Snowflake Gift Tag by chengand3kids

Time to fess up.
DIY gift tags or store-bought?
It's okay, it's a judgement-free zone here. ;)

Thursday, December 12, 2013

Gingerbread Man Gift Tag

Gingerbread Man Gift Tag - Christmas gift tag idea by chengand3kids.blogspot.com

Christmas is just around the corner and we are finally done with our Christmas shopping (YAY!).
Do you know what's even more fun than shopping for Christmas presents?
Wrapping them!

I must admit, I do have the tendency to go a little cray cray with gift wrapping, especially around Christmas. We go to great lengths with all the Christmas decorations and the Christmas tree right? Well, these gifts are going right underneath that tree.

So the way I see it, the gifts also become a part of your decorations.

Am I right?

Or am I right? ;)

I made this Gingerbread Man Gift Tag with my Silhouette Cameo. These are the shapes I used to make this tag:
Gingerbread Man (Design ID #23867)
Button (this shape came with the Silhouette)
Banner (this one also came with the Silhouette)
Easter Shapes (Design ID #40327) - I used the ribbon shape for the ends of the banner.
Chunk Five Font (free download from the internet)

My Silhouette Cameo and I are going to be busy super busy these days. I hope you'll come back to check out the other stuff I make! :)


Wednesday, December 4, 2013

Christmas Stocking Gift Tag

Christmas Stocking Gift Tag by Cheng and 3 Kids

I can't believe Christmas is just a few weeks away! I just hope we get all the Christmas shopping done just in time. My husband put our tree up right after Halloween, which is a bit too early, but the little boy loves it! And you know what else he loves about Christmas? The gifts of course! When he was younger and couldn't read yet, I would use photos as gift tags, just so he'd quit asking me whose gifts are underneath the tree. Now that he's a first grader, I don't really have to do that anymore. But I just couldn't resist using this photo of  his. It was taken during picture day at their school. Doesn't he look handsome? (^_^)

I used my Silhouette cutting machine to make this tag. The Christmas stocking shape is meant for an advent calendar, but I thought it would look cute as a gift tag as well. I hand stitched the edges just to give a little bit of texture. My MIL gave us a sewing machine a while back, and I intend on learning how to use it, but I still haven't gotten around to doing it. Yup, I definitely perfected the art of procrastination.

How about you? Are you done with your Christmas shopping?

I linked this post to these wonderful parties:
Angels Homestead : Saturday Spotlight  |  A Peek Into My Paradise : TGIF Link Party  |  A to Zebra Celebrations : Tuesday Link Party  |  CharlieBeth's "Life as Mumma Walker" : Pin It Party  |  Create With Joy : Inspire Me Monday  |  Creative Geekery : All Things Christmas Linkup Party  |  Domesblissity : Thriving on Thursdays  |  I Should Be Mopping The Floor : Inspiration Monday  |  I Want Crazy : Eat. Create. Party!  |  Love Bakes Good Cakes : Freedom Fridays with All My Bloggy Friends  |  Lydia's Flexitarian Kitchen : Get Inspired Pinning Party  |  Memories by the Mile : Tuesday Trivia and Link Party  |  Mommifried: Ladies Only Blog Share Link Party  |  My Personal Accent : The Blog Strut Owl Style  |  Pink Recipe Box : Creative Wednesdays  |  Pink When : diy Sunday Showcase  |  Rain on a Tin Roof : Give Me The Goods Link Party  |  Silhouette America Blog : Weekly Shape Challenge  |  Table for Seven : Share Your Stuff Tuesdays  |  The Jenny Evolution : Friday Flash Blog  |  The NY Melrose Family : Whimsy Wednesdays  |  The Pin Junkie : Friday Link Party  |  This Gal Cooks : Marvelous Mondays  |  Titi Crafty by Camila : Bewitch Me & Titi Link Party

Tuesday, November 19, 2013

Thanksgiving Teacher Gift

The kids and I are looking forward to the Thanksgiving  break -- one whole week without school -- woot woot! And of course we want to give the teachers a little something to let them know how much we appreciate them.

Thanksgiving Teacher Gift -- Hershey's Chocolate Bar with DIY wrapper by chengand3kids.blogspot.com

These are Hershey's chocolate bars that I wrapped just to make it a little bit more special. The paper is from the Gratitude Kit which is a free digital scrapbooking kit by allisonkimball.com (you can click here to check it out). Then I made the tag using my Silhouette Cameo. This is the first time I used the print and cut feature and I'm so pleased with the outcome. It was really easy to make, thanks to the great tutorial at the Silhouette Blog. I was actually getting over excited while I was making it that my 17-year-old daughter had to keep reminding me to calm down - LOL! ( Yes, I know, I'm such a dork :P )

Thanksgiving Teacher Gift -- Hershey's Chocolate Bar with DIY wrapper

This is what it looks like at the back. I just love gifts with the kids' own handwriting on them. I'm definitely the sentimental kind. What about you?

Here are more gift ideas you might like:

End of the Year Teacher Gift -- Kitkat bar and gift card by Cheng and 3 Kids
End of the Year
Teacher Gift
Free Printable Thank You Tag by Cheng and 3 Kids
FREE PRINTABLE
Thank You Tag
Halloween Teacher Gift -- Hand Sanitizer by Cheng and 3 Kids
Halloween
Teacher Gift

This post was featured at :


I linked this post to these wonderful parties:
Angels Homestead : Saturday Spotlight  |  A to Zebra Celebrations : Link Party Tuesday  |  Carrie This Home : Frugal Crafty Home Blog Hop  | Charlie Beth's Life as Mumma Walker : Pin It Party  |   Create With Joy : Inspire Me Monday  |  Ducks'n a Row : Wonderful Wednesday   I Should Be Mopping The Floor : Inspiration Monday  |  Love Bakes Good Cakes : Freedom Fridays with All My Bloggy Friends  |  Memories by the Mile : Tuesday Trivia and Link Party  |  Mommifried : Ladies Only Blog Share Link Party  |  Mommy Mentionables : Get Inspired With Us Pinning Party  |  My Personal Accent : The Blog Strut Owl Style  |  Oh My! Creative : Whimsy Wednesdays  |  Pink When : diy Sunday Showcase  |  Pink Recipe Box : Creative Wednesdays  |  Table For Seven : Share Your Stuff Tuesdays  |  The Jenny Evolution : Friday Flash Blog  |  The Pin Junkie : Friday Link Party  |  The Thriftiness Miss : Weekend Wonders  |  This Gal Cooks : Marvelous Mondays  |  Titi Crafty by Camila : Bewitch Me & Titi Link Party


Saturday, September 7, 2013

Halloween Treat Jar

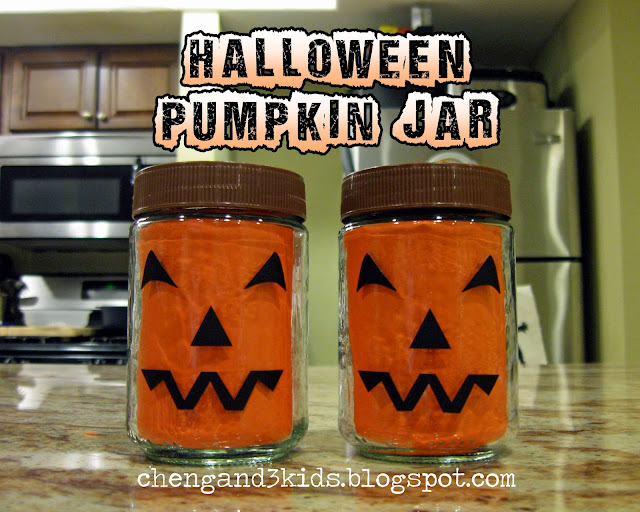
Halloween Pumpkin Treat Jar at chengand3kids.blogspot.com

Halloween is coming up soon so I'm sharing these Halloween treat jars that I made for my little boy's teachers last year. 

I used Jif Hazelnut spread jars that I hoarded saved for projects such as these. I peeled off the label and scrubbed it to remove the adhesive marks on it. 


Then I measured the height of the inside of the jar, and cut my orange card stock paper according to the measurements.


Next, I rolled up the cardstock and inserted it into the jar.

Halloween Pumpkin Treat Jar at chengand3kids.blogspot.com

Since the upper part of the jar is narrower than the lower portion, it kind of helps keep the paper in place. But you can also secure it with scotch tape if you want.

Halloween Pumpkin Treat Jar at chengand3kids.blogspot.com

For the pumpkin face I used my Silhouette Cameo cutting machine to cut black vinyl. But you can also
 cut black cardstock paper with scissors and use double sided tape to adhere it to the jar. 

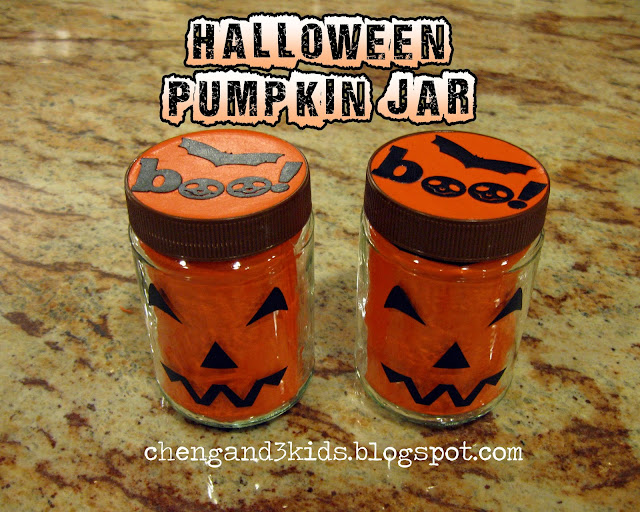
Halloween Pumpkin Treat Jars at chengand3kids.blogspot.com

For the jar lid, I used the Silhouette machine again to cut the orange cardstock in a circle shape, and black
cardstock for the word boo! and also for the bat shape. Then I used Elmer's spray adhesive to adhere them to the lid. Next, I applied a coat of Mod Podge on the lid with a foam brush and waited for it to dry.

The last thing I did was put some candies inside the jar and I'm done! They turned out pretty cute, don't you think?

Here are some Halloween ideas you might like:

Free Printable Halloween Treat Bag Topper by Cheng and 3 Kids
Free Printable Halloween Treat Bag Topper
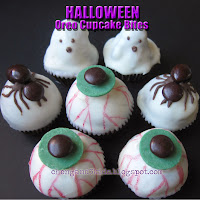
Halloween Oreo Cupcake Bites by chengand3kids.blogspot.com
Halloween Oreo
Cupcake Bites
Halloween Teacher Gift -- Hand Sanitizer by chengand3kids.blogspot.com
Halloween Teacher Gift
{Hand Sanitizer}

This post was featured at:

I linked this post to these awesome parties:
Angels Homestead : Saturday Spotlight  |  Carrie This Home : Frugal Crafty Home Blog Hop  |  Create With Joy : Inspire Me Monday  |  Domesblissity : Thriving on Thursdays  |  I Should Be Mopping The Floor : Inspiration Monday  |  Love and Laundry : Weekend Wonders  |  Love Bakes Good Cakes : All My Bloggy Friends  |  Mellywood's Mansion : Freaking Awesome Fridays  |  Memories By The Mile : Tuesday Trivia and Link Party  |  My Personal Accent : The Blog Strut  |  My Turn For Us : Freedom Fridays  |  Oh My! Creative : Halloween Blog Hop & Link Party  |  Pink When : DIY Sunday Showcase  |  Rain on a Tin Roof : Give Me the Goods Link Party  |  Table for 7 : Share Your Stuff Tuesdays  |  The Jenny Evolution : Friday Flash Blog  |  The NY Melrose Family : Whimsy Wednesdays  |  The Wondering Brain : My Favorite Posts SHOW OFF Weekend Blog Party  |  The Pin Junkie : Friday Link Party  |  Thirty Handmade Days : Pity Party  |  This Gal Cooks : Marvelous Mondays  |  Titi Crafty: Bewitch Me & Titi Link Party  |  Who Needs A Cape? : Super Sunday Link Party