Showing posts with label birthday. Show all posts

Friday, August 29, 2014

Bea's 18th Birthday

Turning 18 years old is a big deal in the Philippines. We call it a debut, and is usually a grand celebration, similar to a quinceanera.

Parents would rent a restaurant or some other nice venue. The celebrant would be wearing a gown, there would be a cotillion dance, 18 roses dance, the 18 candles, and everything is so formal and elegant.

You know how little girls dream of being a princess? Well, this is kind of like being a princess for a day.

And all that is wonderful.

IF you can afford it.

And since we fall into the category of "parents that can't afford it," I had to be a little creative to make my daughter's birthday a little special.


18th Birthday Party by chengand3kids.blogspot.com


Instead of  renting a fancy venue, we celebrated it in our humble home.


18th Birthday Party by chengand3kids.blogspot.com


Instead of ordering an expensive tiered cake, I gathered my baking supplies and made her a chocolate cake with cream cheese frosting, and poured some ganache on top of it.


Paper Flower Party Decoration by chengand3kids.blogspot.com


Instead of  buying party decorations, I put my cutting machine to work and made paper flowers for the wall and also for the table. (If you don't have a cutting machine, you can also use scissors just like they did here.)

Was her party grand?

Absolutely not.

But it didn't make it any less special though. (^_^)


I linked this post to these wonderful parties:


Thursday, June 26, 2014

Banana Cake with Cream Cheese Frosting

Banana Cake with Cream Cheese Frosting ( and pecan nuts ) by chengand3kids.blogspot.com

If you're looking for an easy and foolproof banana cake recipe then you'll love this. I made this cake for my stepfather's birthday and we LOVED it. Even my picky 7-year-old couldn't get enough of it.

Banana Cake with Cream Cheese Frosting ( and pecan nuts ) by chengand3kids.blogspot.com

I found the banana cake recipe on cooks.com, and I'm so glad I tried it. It was so moist and delicious, and you'd never guess it wasn't made from scratch.

The cream cheese frosting recipe is from one of my favorite bloggers, I am baker. She used this frosting for her zucchini cupcakes and she was absolutely right, this is the best cream cheese frosting I've ever had. But I did use less sugar though. Maybe next time I'll try not to chicken out and use the exact amount of sugar on her recipe. :)

And since I like A LOT of frosting on my cakes I doubled the cream cheese frosting recipe. Now I know, I couldn't use all of that frosting on the cake, but here's what I did. You know how you get rid of the cake dome by cutting off the top part of the cake? I slathered my leftover frosting on that and sprinkled some toasted pecan nuts. Waste not, want not. :)

So without further ado, here's how I made this Banana Cake with Cream Cheese Frosting. I hope you guys love it just like my family and I did. :)

BANANA CAKE

Ingredients:
1 package yellow cake mix ( I used Betty Crocker)
1/8 teaspoon baking soda
3/4 cup water
1/3 cup butter, softened
3 eggs
2-3 medium size ripe bananas, mashed
1/2 cup chopped pecan nuts

Heat oven to 350 degrees F. Grease and flour cake pans ( I used two 8 inch rounds ). Stir 1/8 teaspoon baking soda into the cake mix. Beat cake mix, water, butter and eggs on low speed for 30 seconds, then on medium speed for 2 minutes. Stir in the mashed bananas and nuts. Pour into the cake pans. Bake for 30 to 35 minutes or until toothpick inserted in center comes out clean. Cool 10 minutes before removing from pan. Cool completely before frosting.

CREAM CHEESE FROSTING

Ingredients:
1 package cream cheese ( 8 oz. ), softened
1 stick butter ( 8 tablespoons ), softened
4 cups confectioner's sugar ( I used 3 cups, but next time I'll try 4 )
1 teaspoon vanilla extract

Place room temperature butter, cream cheese, and vanilla into mixer and blend for 1-2 minutes on medium until fully incorporated. Add confectioner's sugar one cup at a time, until frosting is light and creamy.

If you're a newbie at making cakes like me, you might want to watch this video on how to assemble and frost cakes. You can also decorate the sides of the cake with chopped pecan nuts. Not only does it hide imperfections, but I also love the taste of toasted nuts.

This post was featured at :


Posed Perfection


I linked this post to these wonderful parties:


Thursday, April 24, 2014

Yellow Cake with Chocolate Whipped Cream Frosting

Yellow Cake with Chocolate Whipped Cream Frosting by chengand3kids.blogspot.com

Making layered cakes have always scared the heck out of me. I was so sure that I would mess it up somehow.

But for my mom's birthday last month, I decided to confront this fear once and for all. 


Yellow Cake with Chocolate Whipped Cream Frosting by chengand3kids.blogspot.com


And boy am I glad I did, because now I am totally hooked on making them!


Yellow Cake with Chocolate Whipped Cream Frosting by chengand3kids.blogspot.com


My mom doesn't have a sweet tooth like I do. So I knew that buttercream frosting is out of question.

 I decided to use a chocolate whipped cream frosting recipe that I found at Baking with Nadia. And we LOVED it! It was soft, fluffy and not too sweet. Just perfect!

And you know what else I loved about Nadia's site? The video tutorials! She makes them look so easy and her instructions are so simple to follow. Extremely helpful for a newbie like me.

Here's how I made it.

Cake ingredients:
cake mix ( I used Betty Crocker Butter Recipe Yellow )
1 cup milk
10 tablespoons butter ( softened )
4 eggs

I heated the oven to 325 degrees F. Then I greased and floured my two 8" round pans.

I mixed all the cake ingredients making sure not to overbeat it.

I wanted to make three layers but I only have two 8" pans, and I wasn't brave enough to cut the cake into layers. So I poured equal amounts of the cake batter into the two pans and a third container (for the third layer), so I could bake them in shifts. I covered and refrigerated the batter in the container while the first two layers bake (I hope that makes sense).

Bake for 22- 25 minutes or until toothpick inserted in the center comes out clean.

Frosting ingredients:
1 quart or 4 cups heavy whipping cream
6-7 tablespoons of sifted powdered sugar
6-9 tablespoons of high quality unsweetened cocoa powder

Click here to see the instructions and video tutorial on making the chocolate whipped cream frosting.

Nadia also has a video tutorial on how to assemble and frost cake layers. You can watch it here.

You can also add some chocolate curls/shavings on top of the cake just like I did.

Enjoy! (^_^)

This post was featured at:

I was featured on Share Your Stuff Tuesday

My Turn for us


I linked this post to these wonderful parties:


Wednesday, March 19, 2014

Nath's Batman Party

Batman Themed Birthday Party by Cheng and 3 Kids

My little boy is very specific about his birthday parties. When he turned 4 he wanted a Camouflage/Army themed party, his 5th birthday was a Sonic the Hedgehog party, 6th birthday was Avatar: The Last Airbender party. And for his 7th birthday, what he wanted was a Batman themed party.

So what's a mom to do?

Start working on his birthday decorations! :)

Batman and Batgirl Cupcake Toppers by Cheng and 3 Kids


Since his birthday is on a school day, we brought some cupcakes for his class. His school does not allow parents to bring homemade food, so we bought these cupcakes from Vons, and I made the toppers with my Silhouette Cameo. The toppers are pretty much unisex, but I made some Batgirl toppers for the girls, just in case they prefer a female superhero. ;)

Batman Party Decorations by Cheng and 3 Kids

These bats were also made with my Silhouette Cameo. It was really simple but I love how it looked on the wall. Nothing says batcave like a swarm of bats, right?

Batman Birthday Cake by Cheng and 3 Kids

We ordered his cake from our favorite bakery. The topper is actually a toy we got from Walmart. My little guy thought it's the coolest cake ever. :)

Batman Party Decorations by Cheng and 3 Kids

These paper plates are from Party City. As you can see in the photo, we got the Batman themed dessert plates, and solid color dinner plates. I also placed a 12 x 12 cardstock paper underneath which serves as a placemat and it also adds a nice pop of color.

Batman Party by Cheng and 3 Kids

The NATH letters on the tablecloth are also made with my Silhouette Cameo. The print and cut feature is so fun! :)

DIY Batman Gift Wrap by Cheng and 3 Kids

If you've been reading my blog for some time, you'd know that I have a tendency to go a little crazy with gift wrapping ( need proof? click here ). There's just something about a really nice gift wrap that makes me so happy. And my Silhouette cutting machine makes it so easy to make one-of-a-kind gift wraps. Did I mention how much I'm loving the print and cut feature? ;)

DIY Batman Gift Wrap by Cheng and 3 Kids

For this gift tag, I used Adobe Photoshop Elements 9. Then I matted it on a paper that I wrapped in aluminum foil. The foil just gives it a silver metal look that I think looks cool with this particular Batman photo.

Batman Birthday Party by Cheng and 3 Kids

Here's a photo of the birthday boy. I still can't believe he's seven years old. Time flies by so fast... a little too fast if you ask me. (sigh)


I linked this post to these wonderful parties:


Tuesday, June 25, 2013

Daddy Herschel's 61st Birthday

My stepfather turned 61 years old last weekend. We decided to make him a surprise birthday celebration in advance. The little boy had a sleep over with his woewoe and woewa (lolo and lola is Filipino for grandpa and grandma, but when Nath was younger he couldn't pronounce it right, sounded like woewoe and woewa), so we knew for sure that they were coming that day to bring him home.

This is the birthday card I made him. I used the digital scrapbooking kit from Kristal Kreations. You can click here to check out her site. This is the same kit I used to make my Father's Day Freebie.

Birthday Card for Dad

Claire made a drawing of him, but unfortunately I didn't get to take a picture of it. Yes, me, the family paparazzi, forgot to take a picture of something. Still kicking myself about that, by the way.

My sixteen-year-old daughter Bea made this chocolate cake from scratch. 

Chocolate Cake

You want to know how I made the number 61 on the cake? First, I printed out the number, making sure it's the right size for the cake. Then I stapled a piece of wax paper on top of it. And then I melted some white chocolate, spooned it into a ziploc bag, snipped off a corner and piped it onto the wax paper. I tried my best  to follow the shape of the number 61, then topped it off with sprinkles. When I was satisfied with it, I put it into the freezer for a few minutes until the white chocolate is set.

The thing is, I went a little crazy with the birthday candles. And you know how when you have a lot of candles to light, it kind of takes you forever to finish lighting them all? Yeah, that's when the white chocolate started to melt. Yep, our number 61 turned all weird and melty. Oh well, at least we had a good laugh about it. Makes it more memorable, don't you think?

Saturday, May 18, 2013

FREE Printable Birthday Gift Tags

These are free printable HAPPY BIRTHDAY gift tags, it comes in 8 colors - red, black, blue, green, purple, pink, yellow and brown. Each color is available in 2 sizes, 2x3 and 4x6.

I remember watching one of those Korean dramas with my girls, and there was an episode where this rich guy has an ice-queen-wanna-be mom who could not be bothered to remember her son's birthday. Then there was this poor plain-Jane-super-shy girl who tried to cheer him up by taking him to these really inexpensive places, and of course he's not used to going to these kind of places, but later on he finds himself actually enjoying himself. Then towards the end of the day, the girl leans in and whispers to him,"Since today is the day you were born, it is a truly precious day. Thank you for being born." 

I know, I know, it's super cheesy, right? But that doesn't mean it's not true. I don't care what anybody says, everybody wants to feel special on their birthday. So naturally, they're gonna need somebody to make some kind of effort to make their birthday a little bit special. And this responsibility falls on you - yes, you - not the other person sitting right next to you... YOU.

Now, before you go running for the hills, there is no need to fret. Like I keep telling my kids, special doesn't necessarily mean expensive. Sure it would be nice to surprise somebody with a brand new car or an all-expense-paid vacation to some exotic resort, but in this economy, well, good luck with that. (Just kidding!)

What I mean to say is, it really doesn't matter how much the gift costs. What's important is you went out of your way to make this person feel loved. Now that is special. 

I have here some free printable gift tags for you. They're available in eight colors - black, red, blue, pink, purple, yellow, brown and green. Each color comes in two sizes, 4x6 and 2x3. If you want some ideas on how to use these gift tags, you can click here, here and also here. Download, print and enjoy!


Friday, May 10, 2013

Claire's 13th Birthday Party

 My daughters are anime fanatics, so when Claire was turning thirteen, we decided to throw her an anime/Japanese themed birthday party. It was supposed to be a surprise for her, but the day before the party, she caught me making some of the decorations when she came home from school. But even though she was getting suspicious, my parents still took her to Game Stop, hours before the party, so that we can set everything up.

The cherry blossom on the background is a vinyl wall decal we got from Amazon.

This was my daughter's anime or Japanese themed 13th birthday party.

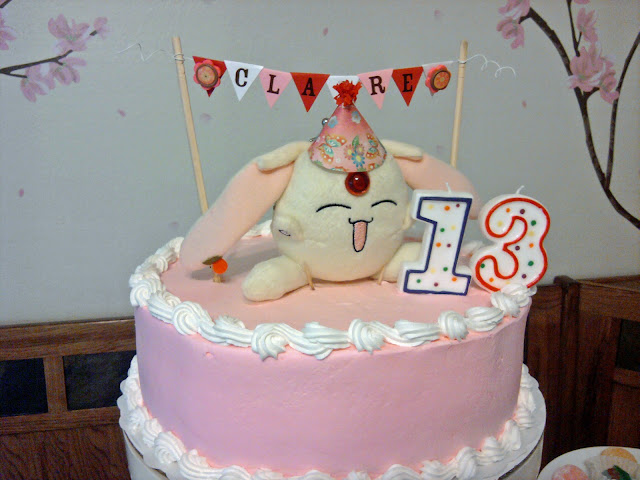
This adorable plush creature on the cake is called a Mokona, and is a character from Tsubasa: Reservoir Chronicle. We used it as a cake topper but it's actually a coin purse. I placed a piece of wax paper underneath it so it doesn't get any frosting on it. I also made the teeny tiny party hat , and the CLAIRE banner.

The adorable character on the cake is called Mokona from Tsubasa Reservoir Chronicles, and it is actually a coin purse.

This was my daughter's anime/Japanese themed birthday party.

This is my daughter's 13th birthday party with an anime/Japanese theme.

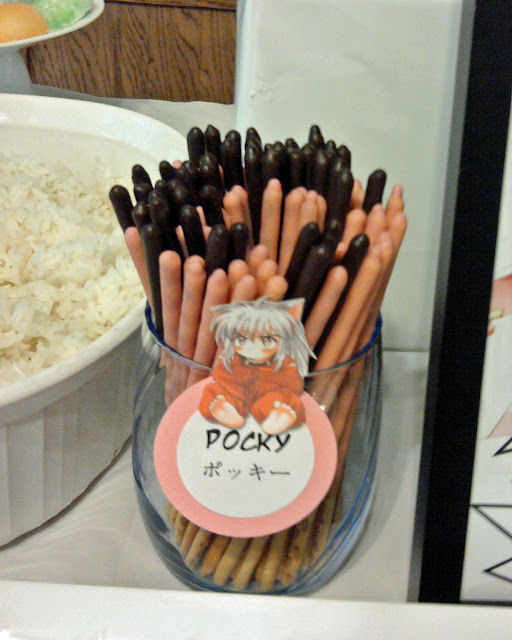
I used google translate for the food labels, the framed image, chopstick holders, candy wrappers and favor tags. The chibi characters on the food labels were pictures we found online. We printed them out, cut them and then used foam adhesive to stick them on the food labels. Aren't they cute?

This is the anime themed food label for Pocky.

These are the anime themed food labels for the sushi.

These are the anime themed food labels for the rice balls or onigiri, and mochi.

These are the anime themed food labels for mochi and beef teriyaki.

 The kids had fun trying out the Japanese food, but I think they were relieved when we ordered pizza. I guess it takes some getting used to.

These are the customized chopstick holders I made for my daughter's anime/Japanese themed party.

Some of the games they played were similar to the games we had for Bea's 15th birthday. We had the chopsticks game - whoever gets the most jelly beans by using the chopsticks wins, fan the balloon game - each person gets one balloon, whoever manages to make the balloon stay up in the air the longest by fanning it, wins, and our own version of fukuwarai - a game similar to pin the tail on the donkey, but instead of using a face, we used a picture of Pikachu. The prize for the games were Hershey's Chocolate bars. I just replaced the wrappers with the a paper with the word Congratulations in English and also in Japanese.

This is the customized Hershey's chocolate bar wrapper I made for my daughter's anime/Japanese themed party.

After the games, the kids went to the living room and played video games.

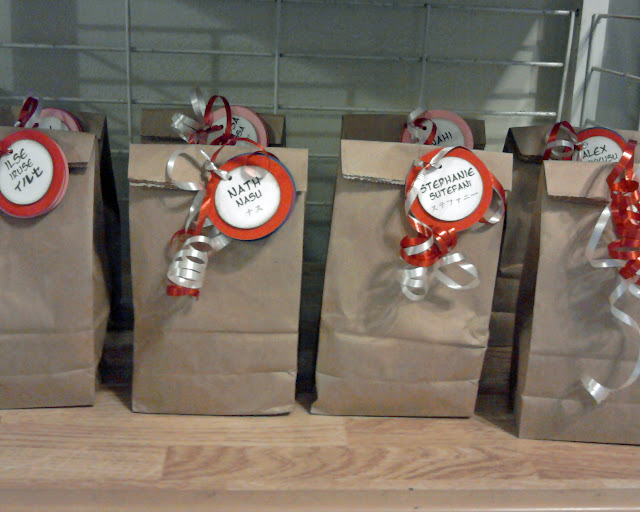
These were the party favors, inside the bags were some Japanese candies. The kids thought it was pretty cool seeing their names written in Japanese characters.

These are the party favors with personalized tags, inside the bags are Japanese candies.


I linked this post to these wonderful parties:


Friday, April 26, 2013

Bea's 15th Birthday Party

This is my daughter's Anime/Movie themed birthday party, they had a Durarara!! marathon.

This was Bea's birthday party when she turned 15 years old (she's turning 17 years old this year). For some reason, my kids tend to gravitate towards all things anime. Is it because we're asian? Hmmm... That's a possible reason, right? Well, anyways, Bea wanted to watch this anime series called Durarara!! with her friends, so we ordered the DVD on Amazon. I don't know if it's popular with the kids but it's about an internet-based anonymous gang called The Dollars in Tokyo, Japan. I searched the internet for party supplies with this theme but there were none, so I had to make most of the decorations.

This was the invitation I made on the computer using Adobe Photoshop Elements. I also made the envelopes. I printed out their names on shipping labels to make it personalized.

This is an anime/movie themed birthday party invitation, it has the characters of Durarara!! on it.

This was the welcome sign on our door. Since the story centers on an internet-based gang, I made this look like the log in page for their site.

This was the welcome sign on our door for my daughter's anime/movie themed birthday party.

This was the backdrop. It's made up of pictures of all her favorite anime characters, and also some of her favorite Korean Pop idols.

These are pictures of my daughter's favorite anime characters and also some of her favorite Korean pop idols.

Her birthday cake was made to look like the invitations.

This is a Durarara!! themed birthday cake made with edible paper.

These were on our walls.

A banner that says HAPPY BIRTHDAY with an anime theme.

These were on the walls for my daughter's anime/movie themed birthday party.

Since they were having a Durarara!! marathon, we served them food that you would usually find at the concession stand in the theater -  hotdogs, nachos, popcorn, candies - you know, the good stuff. (^_^)

This is the dessert table for the party, we served food that can be found on the concession stands in the movie theaters.

Everybody had their own personalized concession boxes.

These were concession boxes from a convenience store that I customized to make it personalized

These were the party favors. If they look like Starbucks Frappuccino bottles, it's because that's exactly what they are. I've been saving them for months.

I used Starbucks Frappuccino bottles to make these party favors.

They played several games before they watched the dvd. First was the chopstick game (whoever gets the most jelly beans by using the chopsticks wins), popping the ballons game (the person who pops the most number of balloons by sitting on them wins), guess the character on the forehead game (this is similar to the Hedbanz game, but the images taped on their forehead are anime characters), hunt for Celty's head game (Celty is a dullahan looking for her stolen head, so we hid different pictures in the backyard, the person that finds the picture of her head wins).

Anime/Movie Themed Birthday Party

It was a hot summer afternoon and our living room was overcrowded, but the kids did not seem to mind. Judging from all the squealing and fangirling, I think it's safe to say that they all had a blast. And hopefully it would be a nice memory for Bea to look back to when she gets older.
   

I linked this post to these wonderful parties: 


Tuesday, April 9, 2013

Claire's Birthday Cake

For my daughter Claire's 15th birthday, I wanted her cake to look really pretty but we had to do it on a small budget. It would be nice to throw my kids big, swanky parties, but the thing is, not everybody can afford to do that. So I had to be a little bit creative to make my teenage daughter's birthday cake look kinda expensive.

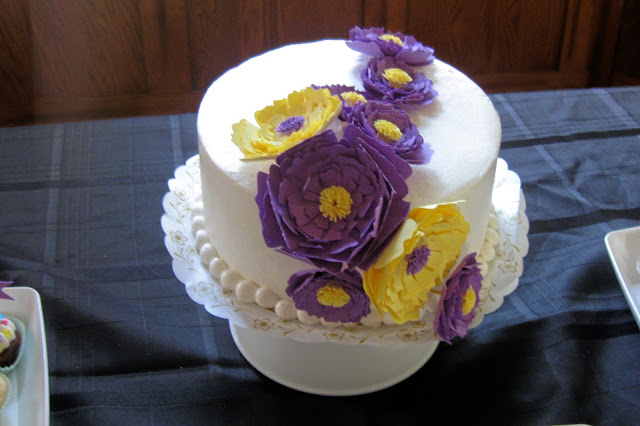
The Silhouette blog gives freebies every Tuesday, and one of the free shapes is the 3d peony shape. Click here to see their tutorial.

I remember seeing a post on the Hostess with the Mostess  about decorating cakes with paper flowers. You can click here to check it out.

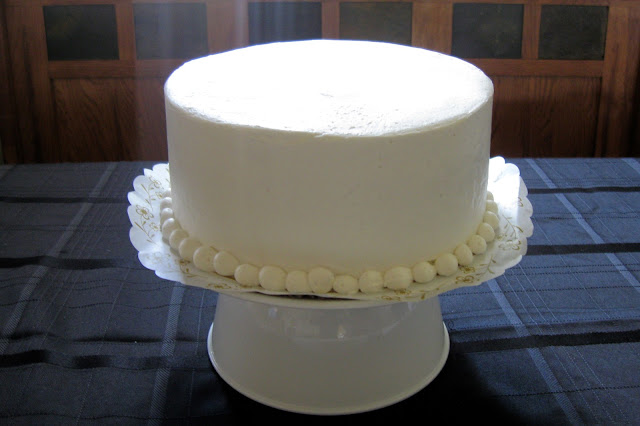
So we bought a plain white cake from our favorite bakery.

This is a plain white cake we bought from our favorite bakery.

And I decided to combine the idea from the Silhouette blog, with the cake decorating idea from the Hostess with the Mostess blog, and this is what I came up with.

This is a cake decorated with paper peony flowers.

 I also made the paper peony for the gift bag, just like they did in the Silhouette blog video tutorial.

This is a birthday cake and paper gift bag I decorated with paper peony flowers

I already had the materials I needed to make the flowers so I didn't have to buy anything, well, except for the cake. I was really happy with how it turned out. Thank goodness we have these wonderful blogs that give us really useful ideas. (^_^) 

This post was featured here:
  

I linked this post to these wonderful parties:


Sunday, April 7, 2013

Claire's 15th Birthday

 
My little girl --- I guess she's not so little anymore (sigh) --- just turned 15 yesterday. We celebrated it at home with my parents, nothing fancy, just a little family get together. Having a lot of people over for parties is fun, but little family gatherings are always nice, it's just more intimate. That's what I think anyways. You want to know a little secret? You see those flowers on Claire's birthday cake? They are not edible. I made them out of paper. Pretty tricky, right? (^_^)


Friday, March 29, 2013

Nath's Sonic the Hedgehog Themed 5th Birthday

This is a Sonic the Hedgehog themed 5th birthday party for my son.

This was my little boy's birthday party last year. Both of us were sick that time so we didn't
want to risk inviting other kids and getting them sick also. But that didn't stop us from celebrating his birthday. I'm guessing it's the same with most kids, but my son's favorite characters/shows/games vary every few weeks, and at that time, his favorite was Sonic the Hedgehog. Luckily they had some Sonic party supplies available at Party City because I wasn't really feeling well enough to make the decorations myself.


Sonic the Hedgehog Birthday Cake customized with edible paper.

Sonic The Hedehog Themed Birthday Party Decorations

On the wall on the left, I put some of my favorite pictures of him in the frames. On the right side, I taped NATH IS FIVE letter cutouts on our magnet board and hang some pictures of Nath with family, so even though we couldn't invite them, they were kinda there with us, I don't know if that makes sense with you guys. (^_^)

This is the doughnut eating game we did for my son's Sonic the Hedgehog themed birthday party.

We played the "Donut Game," eating a donut hanging from the wall without using hands. It was hilarious watching them try to bite the donuts, especially when some of the donuts were swinging around and kept hitting them in the face.


My little guy eventually got tired and just grabbed the donut and started eating it like there's no tomorrow. It's against the rules of the game, I know, but what good is being the birthday celebrant if we couldn't bend the rules for him a little bit. (^_^)

We also played "Pin the Ring on Sonic Game" and "Sonic Says."


And that concludes Nath's 5th birthday celebration. It wasn't extragavant in any way, but I think the most important thing about a birthday party is making the celebrant feel special. And I hope he would look back to this day and remember that he is loved and that we are thankful for having him in our life. (^_^)